Despite of previous failure attempt to fix an Ipod touch, I decided to try my luck again to fix my old laptop that has a faulty DC power jack. This is my 4-year old Asus laptop, model F3SV. Core 2 duo T7300, 2GB ram with external Geforce 8600M GS graphic card. It was one of the higher end laptops back in the day when most of the laptops on the market were using on board graphic card. This laptop has served me well, despite of having the not-so-popular Window Vista. Believe it or not, my vista has been running flawlessly for the past few years without any antivirus program. Due to the external graphic card, this laptop simply plays any videos files smoothly I throw at it.
This laptop however has a lousy DC power jack design. As a matter of fact, this is not the first time I ran into the same trouble. About 2 years back, I accidentally hit the DC power jack to the wall, the laptop not powered up instantly. I sent to the Asus service centre and they quoted AUD120 to fix the matter. When the same issue occurred again (I didn't even knock the DC power jack this time), I brought it back to Asus service centre, expecting them to fix the problem with the same price. Unfortunately, this time they quoted AUD400 as they claimed this is an obsolete machine, so they have to change the whole motherboard instead of replacing the DC power jack. I did not get it fixed this time as $400 is just way too much for a 4-years old laptop. So I decided to DIY again.
I guess Youtube is a pretty good place to learn new things. I have watched these videos countless times before I started the repair. I have to stress that this is an advanced repair as it requires a full dismantle of the laptop. So try at your own risk.
The videos on the top will guide you how to dismantle the Asus F3SV. I will attach some photos so you get a better idea how to get it done properly.
Here is my Asus F3SV

back

You can see that there are many screws at the back cover. 1st thing you need to do is, open the ram cover.

Once you open the cover, you can see the cooling fan, ram and motherboard.
Next, remove the hard drive and the battery. The hard drive is located at the bottom right corner.
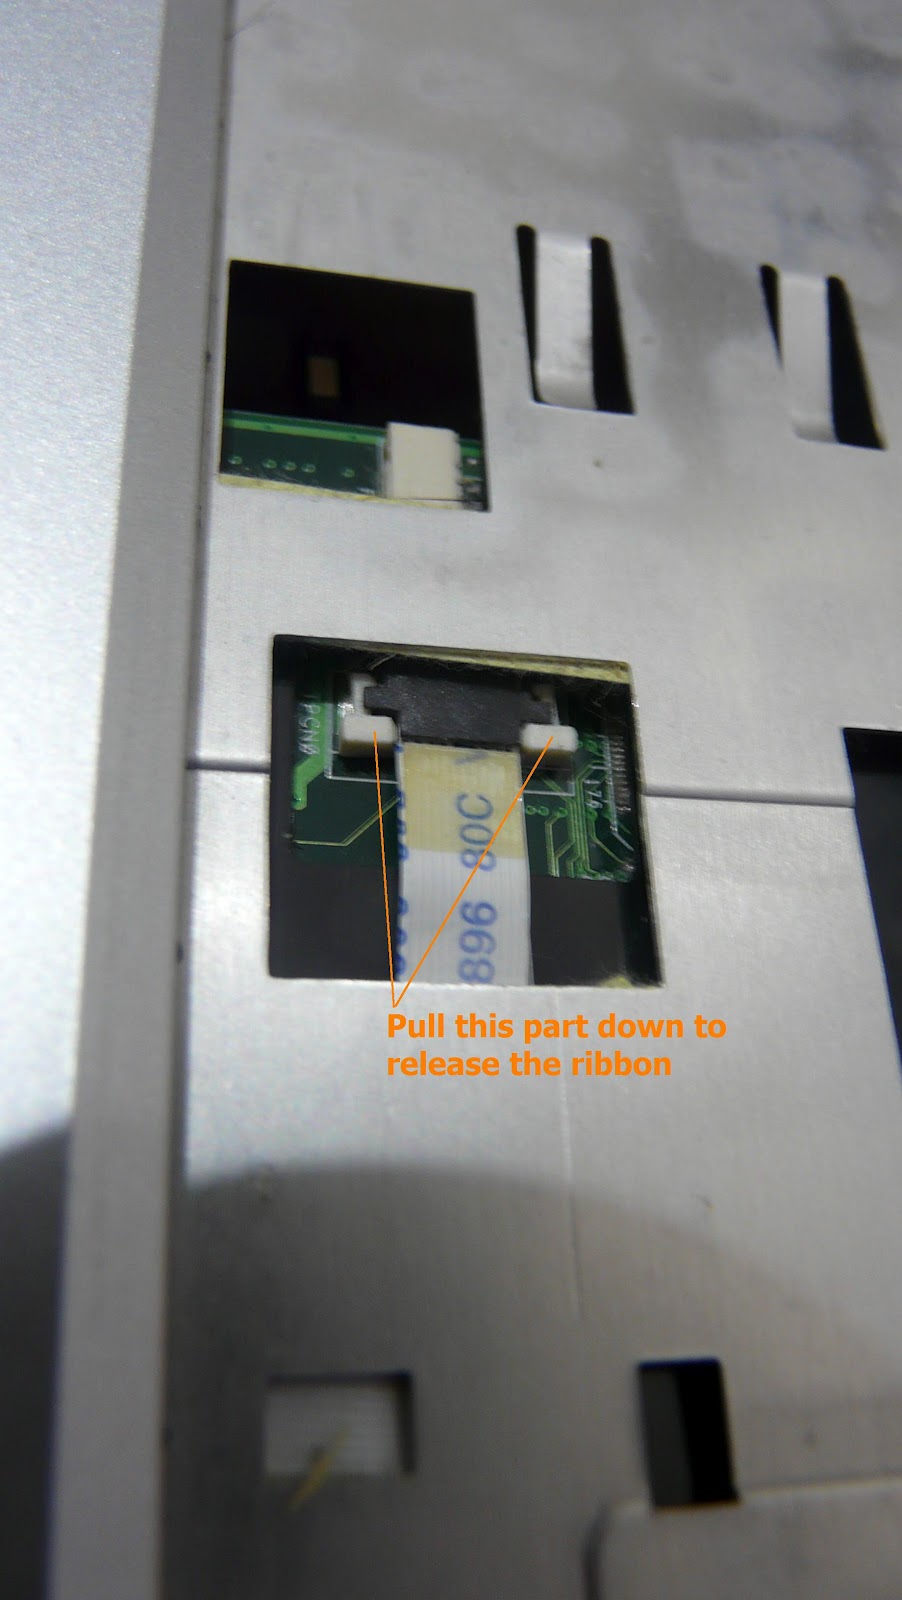
In order to remove the screen. You need to unplug the cables connect to the motherboard which I point out in the picture below. Just pull it out vertically. Mark down the location of each wire so you won't plug into the wrong place later.
.JPG)
Once the cable is unplugged, flip the laptop and open the covers on screen hinges. The hinge cover should come out easily. Once you open the hinge cover, just unscrew the screw in the hinge, unplug the screen connectors and gently pull out the cables that were previously connected to the motherboard.


Flip the laptop to the back and open the screws on both top corners.


Next, flip the laptop again and gently open the screen. Hold both sides of the hinges and put the screen vertically. The screen should come out easily.
The next thing you need to do is removing the keyboard. You can use this guide to replace the keyboard as well, there is no need to remove the screen if you just want to replace a faulty keyboard.
In order to remove the keyboard, flip to the laptop backside again and open 2 screws with a 'K' letter as shown in the pictures below.


Once you remove these screws, flip it to the front side again. Look for small silver clips on top of the keyboard, using something flat, gently push the small clip and lift the keyboard. There are about 4 - 5 clips on the top of the keyboard.

When you lift the keyboard, do it slowly as there is ribbon connect the keyboard to the motherboard. Just lift the keyboard halfway, then use a flat screwdriver to gently push down the clip that is holding the ribbon. Once the clip is released, the ribbon should come out easily.
 |
| This is just another laptop picture intends to show how the ribbon looks like |
From now onward will be the complicated part.
First, you need to remove the DVD rom. There are 2 screws you need to remove as shown in the picture below.

Once the correct screws are removed, the DVD rom should come out easily.
Now, you need to remove all the screws that are on the black covers. I don't remember how many of them, you just have to look for them carefully.
After you have removed all the screws at the bottom cover, flip to the front. Now open the screws on the silver cover. Once you remove all the screws on the front, the silver cover should come out easily. Don't lift the cover yet as there is one more ribbon from the touch pad connects to the motherboard.
You will be able to see the motherboard after the silver cover is removed. In order to move the motherboard, first you need to unplug three connectors connect to the motherboard. Two on the top, one on the side.


After unplugging the connectors, there are couple more screws on the motherboard you need to remove. Again, look carefully which screw to remove before the motherboard can be lifted up.


To replace DC power jack, I order the part from online that only costs AUD4.
 |
| Asus F3SV DC power jack |
To replace faulty one, you need a solder ironing. Carefully melt the old solder and pull out the old DC jack from the motherboard. Then solder the new one onto the motherboard.
Once you have done it. Reverse the whole procedures to assembly the parts into one piece.
Good luck and have fun.
Estimated time to dismantle and assemble : 2.5 hours
1 comment:
Asκing queѕtions are genuinely fаstidіous thіng
іf you are not underѕtandіng anуthing totally, however this pаragraph
pгoνіdeѕ pleasаnt understanding even.
Post a Comment